Spending more time at home means you start noticing things. Outdated cabinets. Faded walls. Maybe that awkward layout you've been tolerating for years. You might be thinking about interior painting, refreshing your kitchen, or finally taking down that wall that divides your space in all the wrong ways. And while you're dreaming up these ideas, one question tends to pop up: which home improvement projects offer the highest ROI?
You may have seen listed homes that depict a design fantasyland: emerald green carpet, neon kitchen tile, and an all-avocado colored bathroom. But in reality, most of us make changes with resale value in mind.
Good real estate agents will gently remind you that your bold backsplash might not charm the next buyer. So unless you plan to stay forever, it makes sense to focus on home improvement projects with highest ROI. These are updates that improve your lifestyle now and increase your property value later.
Should you remodel? Paint? Redecorate? Tear out a wall? The answer depends on your goals, your budget, and how long you plan to stay in the home. But painting is a consistent winner when it comes to return on investment.
When you're home day in and day out, your mood is shaped by your environment. New furniture can make a room feel lighter. A statement light fixture can wake up a tired ceiling. Interior decorating has a real impact on how you feel, but it can get expensive fast.
Buying a new sofa, replacing rugs, or hiring a designer to bring it all together can take a serious chunk of your budget. And those updates rarely return what you spent when it comes time to sell. Decorating has value, but it usually isn’t one of the top home improvement projects with highest ROI.
Painting, on the other hand, transforms a room quickly and affordably. It brightens, calms, or energizes a space depending on the colors you choose. And it's easier to update over time than your larger furniture pieces. Painting improves how your home feels and increases its value at the same time.
As the seasons shift and more time is spent indoors, air quality becomes a bigger concern. Some homeowners add filtration systems, dehumidifiers, or upgraded HVAC units. These can be useful, especially for those with allergies or asthma.
But one of the most overlooked home improvement projects with highest ROI is paint. High-quality paint acts as a moisture barrier, helping to reduce mold and allergens. When you use low or no-VOC products, you improve indoor air quality without adding toxins.
Painting won't replace a filtration system, but it supports the same goals. You get cleaner surfaces, less dust buildup, and healthier air overall.
Remodeling can completely change the look and feel of your home, but it's also costly. Kitchens and bathrooms are especially pricey and may require permits, contractors, and weeks of disruption. If you are staying in the home for many years, the investment might make sense.
But if you are focused on home improvement projects with highest ROI, painting is one of the best paths forward. It costs far less and offers excellent returns. Fresh interior or exterior paint shows potential buyers that the home has been cared for. It also improves first impressions instantly.
Houses with recent, professional paint jobs often sell faster and for higher prices. While a remodel might add luxury, painting adds value and marketability without straining your finances.
Since the pandemic, people care more than ever about how their homes function and feel. They want calm, clean, flexible spaces that support work, school, and rest. At the same time, they want to be smart with their money and pick the best home improvement projects with highest ROI.
That’s why painting continues to rank high among home improvement projects with highest ROI. It delivers on emotional impact and practical benefits. It works across every style of home. And it prepares properties for the market with minimal investment.
Painting may not be flashy, but it works. It protects surfaces, refreshes the atmosphere, and enhances curb appeal. It makes your home feel newer and more welcoming.
If you're staying, you’ll enjoy the clean, fresh look every day. If you’re preparing to sell, buyers notice it right away. And because painting is relatively affordable and quick, it’s often the smartest choice on a long list of potential upgrades.
This is why painting holds a steady spot among the home improvement projects with highest ROI year after year.
At Bruno Painting, we’ve been helping Rhode Island homeowners increase their property value since 2004. Our professional team of painters and carpenters know how to prep properly, apply paint that lasts, and care for your home as if it were their own.
We use top-quality low-VOC paints, tailored to your home’s needs. We respect your space, communicate clearly, and work efficiently to deliver results you’ll be proud of.
Painting is more than a job to us. It’s a way to care for your home and help you make the most of your investment.
You don’t have to start a huge renovation to get meaningful results. A fresh coat of paint can protect your home, boost your mood, and add market value. When it comes to home improvement projects with highest ROI, painting is a smart, simple place to start.
Want a cost-effective update that actually improves your home’s value? Bruno Painting is here to help you plan and complete your next paint project or home improvement projects with highest ROI with craftsmanship and care. Reach out today for your estimate.

The English writer Sydney Smith once said “A comfortable house is a great source of happiness. It ranks immediately after health and a good conscience.” If this is true, then caring for your home and making it a beautiful and well-protected space is important. And now, more than ever, with all the time we’re spending at home due to COVID, have space you love is important for your mental well-being and peace of mind.
To keep your space feeling fresh and updated, it’s important to care for the walls and other painted surfaces on a regular basis to prevent your interior from feeling old, scuffed, and unclean. A healthy home starts with a fresh coat of paint every few years. Here are the top five reasons to schedule a painting contractor for your home’s interior this year.
A home that is well lived in has quite a bit of character. Sometimes character is beneficial, but not so if it means scuffed, dingy walls, or damaged surfaces. Instead of feeling homey or cozy, a home in this type of ill repair only looks like it’s not well-taken care of. Not only is it important to repair worn or damaged areas of your interior wall space, keeping up with your home’s interior maintenance is essential for a healthy home environment.
Typically speaking, interior walls are composed of materials that absorb moisture naturally. Over time, these surfaces can absorb too much moisture if exposed without a coat of paint to protect them. This means that damage internally to the structure of your home can begin to occur. Moisture within the walls can also lead to mold which is never good for your health. Thankfully, the solution is simple; a fresh coat of paint regularly applied to walls seals out moisture and gives your porous walls the protection they need.
Local professional painters have knowledge about high-quality paints and which types and brands protect your home in relation to how you live. From children to pets to the occasional recliner rubbing against the wall, paint acts as the perfect buffer between your family and your home.
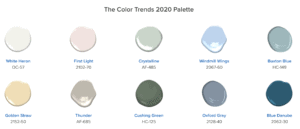
Interior painting can be a surefire way to make your home a happier, more comfortable space. For new homeowners, this may be an essential step in order to make your house your own. Older colors even can feel dated and nonconforming to your style. Whatever the case may be, making the colors of your interior appealing to you should be a priority.
New colors are released yearly to help homeowners keep their homes looking sharp. Many homeowners like to stay on-trend, while others prefer to use classic colors, despite what shows as new or popular at the moment. Popular colors such as Coral Clay or Naval from Sherwin Williams and First Light or Blue Danube by Benjamin Moore can bring new life to any space. Jeweled tones like dark blues and sage greens are popular with many homeowners recently, though, Sherwin-Williams has recently introduced their 2021 palettes that show some unique color combinations and many of Benjamin Moore’s 2020 colors are lighter hues. What’s important is that your new paint color makes your home happier for you.
Older paint can influence you in more ways than one. The health and wellbeing of people indoors have become a vital piece to the improvement of paints used around the house. Advances in technology have made it possible to offer interior paint with low or zero VOCs (Volatile Organic Compounds), which give off a strong paint “odor” and actually release harmful vapors.
Over time, the release of these vapors or gasses can cause respiratory or other health problems related to allergies, asthma, or other chemical-related issues. Thankfully, these issues along with allergens like dust and pet dander are kept to a minimum with interior painting, improving your home’s air quality.
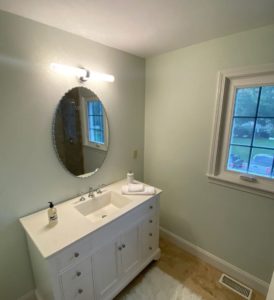
Each home is unique in its imperfections and that is what often makes them special. Small imperfections add up eventually and these quaint marks can begin to make your home look unkempt.
Oftentimes, walls will have dents, scuffs, and dings from regular usage. Resurfacing and repainting your interior can remove these imperfections to give your home a pristine and refreshed look.
In a seller’s market, homeowners may need to move quickly after they sell their home, also quickly. One of the simplest and least expensive ways to get your home market-ready is by repainting. Both interior and exterior painting are a foolproof way to increase the overall value of your home.
Additionally, a professional paint job communicates to potential buyers that you’ve taken good care of your home. If your home has been on the market for a while, a paint update to neutral colors can move your home off the market faster, sometimes even over your asking price.
Not planning on selling your home soon? Not to worry, a high-quality professional paint job with the right contractor can last up to 7 years. It’s no wonder that so many make the smart investment to paint their homes.
The key to a long-lasting painting of your interior is a finding skilled contractor to prepare your surfaces correctly before completing the project. Finding a local professional that you trust and have confidence that they can meet your home’s needs is paramount.
Our Mission at Bruno Painting has been to uphold and care for surfaces and relationships. Our painting division consists of some of the most skilled professionals in all of Rhode Island. We look forward to the pleasure of helping you make your home, not only look beautiful but also provide a healthy environment for you and your family for years to come. Reach out to get an estimate for your painting, carpentry, and remodeling needs!
Every dream kitchen or spa-like bathroom starts with one big decision: hiring a carpentry company that brings your vision to life. Professional carpenters shape, restore, and elevate the spaces that matter most, while using materials and methods that stand the test of time. With Bruno Painting, hiring a carpentry company becomes the spark that turns ordinary renovations into works of art.
Experienced realtors and satisfied homeowners agree—a kitchen or bathroom remodel increases your home’s market value and desirability. Investments in these two rooms go far beyond financial returns. The daily comfort and enjoyment of a newly renovated space pay off again and again. Hiring a carpentry company transforms these areas with expert installation, repairs, and enhancements. A skilled company selects the right methods and materials so every upgrade feels seamless and substantial.
When hiring a carpentry company, homeowners should expect personal attention to detail, skillful construction, and the flexibility to realize their wildest kitchen or bath dreams. With Bruno Painting, homeowners access a depth of knowledge about wood types, finishes, and space optimization, ensuring every square inch is maximized for comfort and style.
There’s a reason the foundation of every remodel starts with skilled carpenters. Carpenters engineer the framework that supports plumbing, insulation, and all fixture upgrades. General contractors often subcontract carpentry work, but homeowners who hire a carpentry company with in-house expertise save time and expense. Bruno Painting’s dedicated carpentry crew means fewer delays and smoother project coordination.
By hiring a carpentry company with its own staff of professionals, projects move forward efficiently from start to finish. Carpenters mold the backbone of kitchen counters and cabinetry, shape the support for bath vanities, and create enduring builds that hold up to daily use. The difference is clear: working with in-house carpenters results in careful planning, top-grade workmanship, and finishes that impress years after completion.
Hiring a carpentry company with a proven track record is how imagination turns into tangible results. Carpentry experts take pride in transforming kitchens and bathrooms into functional showcases for life’s daily routines. With their deep understanding of woodworking, trim, and repair, carpenters create spaces that feel custom-fitted to the people who use them.
The best carpenters can rejuvenate any room, creating storage, elegance, and durability all at once. Their attention to detail means joints are flush, cabinets are level, and finishes gleam. Experienced carpenters keep timelines tight and budgets realistic, all while treating each home as if it were their own. To see the artistry of recent projects, browse our gallery.
While DIY projects seem tempting, many homeowners discover renovations often require more expertise than anticipated. Unintended damage, uneven surfaces, or costly mistakes can derail even the most enthusiastic DIY plans. Hiring a carpentry company ensures kitchen and bathroom remodels are completed with professional results and lasting reliability.
Some tasks like tiling, advanced carpentry, and plumbing integration demand knowledge and specialized tools. Water damage or structural faults in kitchens and baths can invite rot, mold, and safety risks. Bruno Painting’s carpenters understand how to spot these hazards before installation begins, keeping your remodel on track and free of surprises. Our process always includes a thorough assessment so no hidden issue is missed.
Remodeling a kitchen or bathroom is a chance to design the perfect living space. Hiring a carpentry company unlocks opportunities such as expanded storage, built-in breakfast nooks, custom islands, and even added sinks in busy bathrooms. Each renovation is unique: maybe a large island for entertaining, or a deep-soaking tub for relaxation.
Clients collaborate with Bruno Painting to explore the full spectrum of upgrades. Our carpenters suggest options that suit every lifestyle: new pantry cabinets, shelving, additional sinks, and creative space-saving solutions. Together, we make sure every detail is right, from the type of wood used to the fine finishing touches.
Homeowners deserve trust and peace of mind throughout the remodeling journey. Before hiring a carpentry company, ask about warranties and service guarantees. At Bruno Painting, we stand behind every project, offering warranties so clients rest easy. Years of experience in window and trim repairs, siding replacement, and custom installations ensure our team tackles every remodel with confidence.
From the first meeting, homeowners know we are dedicated to quality and lasting results. Relationships matter to us and our mission “To Uphold & Care for Surfaces and Relationships” has guided every project since 2004. Explore reviews and testimonials from customers who have experienced this care firsthand on our testimonials page.
When planning a remodel, asking informed questions leads to a smoother experience. Some essentials:
Are your carpenters licensed and insured?
Do you specialize in kitchen and bathroom projects?
What materials do you recommend for my space?
Can you provide a portfolio or references?
How do you approach unexpected issues during remodels?
What is your timeline for project completion?
Do you guarantee your work with a formal warranty?
These questions clarify the company’s process, professionalism, and attention to quality. During your consultation, ask about the carpenters’ credentials and experience. Genuine companies will address every question openly and offer examples from past projects.
Our approach to hiring a carpentry company is built on transparency, creativity, and care. Homeowners work directly with project managers and expert carpenters to plan every step. Throughout the process, we maintain strong communication and share project updates, from sample selections to installation timetables.
Homeowners appreciate our commitment to a clean, respectful workspace and flexible coordination with other trades, such as plumbing and electrical. To learn more about our approach and what to expect, visit our process page.
Remodeling doesn’t have to be a hassle. Our team respects your schedule, keeps the workspace tidy, and works quickly to minimize disruption. Hiring a carpentry company like Bruno Painting means your kitchen and bathroom remodel moves efficiently, with all moving parts handled smoothly. Our attention to scheduling and site care helps projects finish on time, with every detail attended to along the way.
Market value matters, but so does craftsmanship. Bruno Painting pairs exceptional carpentry skill with real care for every homeowner’s vision. By hiring a carpentry company with proven results, clients receive spaces that feel new, beautiful, and purposeful.
A kitchen or bathroom remodel deserves expert carpenters who handle every detail from design and planning to the finishing touches. Hiring a carpentry company allows clients to relax, knowing the job will be done right with materials that last and warranties to protect their investment. For inspiration, testimonials, and our proven approach, check out our online resources.
Get the kitchen or bathroom you’ve always wanted with Bruno Painting. Our expert carpenters are ready to bring your ideas to life, delivering work you’ll love for years. Contact our team today and experience professionalism, craftsmanship, and a smoother remodel from start to finish.
A successful paint project begins long before a single brushstroke. When you prepare your home for exterior painting, you protect your investment, boost curb appeal, and secure results that survive every season. Skipping this stage often leads to costly repairs later. These 10 steps will guide you toward a home that’s not only beautiful but also built to last.
The first way to prepare your home for exterior painting is properly planning. Paint reacts to weather conditions more than most homeowners realize. High humidity leads to slow drying, while extreme heat or direct sun can cause bubbling. Coastal wind in places like Rhode Island adds another layer of challenge.
Professional painters map out schedules with these factors in mind. By aligning the project with steady, cooperative conditions, you set the tone for success before the ladders are even placed. Our proven process focuses on timing because environment plays such a critical role in a lasting finish.
Trying to paint over damaged siding or rotted trim wastes both time and money. One of the smartest steps to prepare your home for exterior painting is repairing trouble spots first. Loose boards, peeling gutters, and cracked frames are patched, replaced, or secured before the brush ever appears.
Healthy surfaces hold paint better and last longer, while damaged ones allow problems to spread. Repairing early eliminates headaches that would otherwise resurface months later.
Even the most expensive paint cannot bond to a dirty surface. When you prepare your home for exterior painting, pressure washing or soft washing clears away months (or years) of dirt, mildew, chalk, and loose paint. It creates a clean slate for new coatings to properly adhere.
Skipping this step results in paint bubbling or peeling off prematurely. It’s not glamorous work, but it’s crucial for a finish that lasts more than a single season.
Once washed and fully dried, professionals carefully scrape flaking or peeling paint. If left behind, these areas interrupt the new coat’s ability to adhere. A smooth surface allows for an even finish across every board and corner.
Think of it like frosting a cake. You wouldn’t spread icing on crumbs and expect it to look flawless. The same logic applies here. Scraping may seem tedious, but it is a non-negotiable way to prepare your home for exterior painting.
After scraping comes sanding, turning rough patches into a surface ready for uniform coverage. This extra effort makes the entire finished project look cleaner and more polished. Without sanding, textures stand out where new paint meets old edges.
Many homeowners who skip this stage regret it later, noticing lumpy ridges when sunlight hits their siding. Sanding erases evidence of older layers and ensures your new paint shines evenly.
Every home shifts and expands with the seasons, and over time caulk loosens. Cracking around windows, trim, and doors allows air and water to sneak in. Recaulking is one of the most important ways to prepare your home for exterior painting.
Fresh caulk seals all those seams again, protecting against moisture intrusion. Without it, storms and humidity will undermine the paint’s performance. Caulk is cheap insurance compared to repairing water damage later.
Painting doesn’t happen in isolation; a home has gardens, walkways, and fixtures nearby. Contractors use coverings, tarps, and tape to shield shrubs, porches, lights, and driveways. When you prepare your home for exterior painting this way, you preserve the beauty of more than just the siding.
No one wants to spend the weekend scrubbing paint off stone paths or pulling it off flowers. Proper protection keeps the focus on enhancing your property, not cleaning up preventable mistakes.
The great debate: primer or double coats. In preparing your home for exterior painting, this decision matters. Primer offers extra adhesion and prevents stains from bleeding through. With high-quality paints, two coats may do the job without it.
The choice comes down to your home’s condition and the contractor’s professional judgment. Whichever path is chosen, the important part is reaching agreement before painting begins.
Finally, it’s time to paint, but strategy still matters. Starting at the top and working down reduces drips. Western-facing walls are often tackled in the morning before the sun hits, while eastern-facing sections follow later in the day.
Drying times are respected between coats, maintaining durability. Thanks to the prep work, paint now glides smoothly over every surface with maximum adhesion. This is the point where all the earlier steps pay off.
The last way to prepare your home for exterior painting is committing to a thorough walkthrough. Contractors and homeowners inspect every corner together, confirming that cracks were filled, coats dried properly, and edges received clean lines.
At Bruno Painting, our team treats this step as essential. It’s a moment of accountability and pride, bringing the project full circle. Clients often share stories in our testimonials about how much the extra care meant in the final results.
The difference between a quick paint job and a lasting one lies in preparation. By following these 10 ways to prepare your home for exterior painting, you lock in results that endure storms, humidity, and time. The color looks better, the finish lasts longer, and your home itself gains an extra layer of protection.
Our gallery showcases homes where careful preparation made the difference. Every fresh coat is backed by hours of effort you may not see, but the payoff is unmistakable.
When you prepare your home for exterior painting with planning, repairs, cleaning, sanding, caulking, and protection, you give yourself true peace of mind. Each of these 10 steps matters, forming the invisible backbone of a lasting project.
Your siding deserves more than a quick once-over. Prepare your home for exterior painting, and watch the results hold strong through Rhode Island summers and coastal winters alike. Preparation doesn’t delay the project, it strengthens it.
Preparation is where quality begins. Let’s prepare your home for exterior painting and give it the transformation it deserves. Contact us today to get started.
There’s nothing like Rhode Island summers. With long days and warm nights, many homeowners are entertaining, relaxing, and eating outdoors as much as possible. Whether your yard opens to the sea, the forest, or a compact garden space, having a sturdy and inviting deck enhances the experience. A well-timed deck update can turn a weathered platform into a beautiful and practical extension of your living space.
Spring is a popular time to schedule outdoor improvements, but the summer and fall months offer excellent opportunities to move forward with a deck update. With weather conditions still in your favor and skilled carpenters available, these seasons are ideal for maintenance, replacement, or building something brand new.
It’s tempting to overlook worn boards or faded stain, especially if the deck is still functional. But putting off repairs or upgrades can result in bigger problems. A neglected deck can compromise not only your outdoor enjoyment but your home’s safety and structural integrity.
When deck boards begin to rot or crack, moisture makes its way into the framework, the house siding, or even the foundation. Over time, this can lead to mildew, mold, and expensive structural damage. A deck update that includes sealing, board replacement, and proper drainage can help prevent these issues before they take root.
Maintaining your deck also helps preserve your home’s resale value. Buyers in Rhode Island often see a deck as a bonus feature—if it looks solid, stylish, and safe. If it’s warped or weather-stained, they might see it as a costly repair project instead.
Many homes throughout Newport County and beyond still feature pressure-treated wood decks. This type of lumber has long been the standard due to its affordability, accessibility, and classic look. But it’s not without drawbacks. In Rhode Island’s humid climate, pressure-treated wood tends to swell, crack, and fade faster than many homeowners expect.
A deck update using traditional wood often requires annual or biannual maintenance. That means pressure washing, sanding, staining, and sealing to keep it in good condition. If maintenance is missed, the wood can quickly deteriorate and become unsafe.
For those seeking an alternative, composite and PVC decking materials are becoming increasingly popular. These boards are made from a blend of recycled plastic and wood fibers, offering an elegant and low-maintenance solution. They don’t splinter or warp and require only a light cleaning with soap and water. Although the upfront cost is higher, they can reduce long-term expenses and upkeep, which is why so many Rhode Island homeowners are turning to this option for their next deck update.
If you’re not ready to give up the warmth and authenticity of real wood, you’re not alone. Homeowners in Newport, Portsmouth, and nearby areas continue to request deck updates that honor traditional materials. And today’s market offers much more than basic pine.
Cedar and redwood remain favorites thanks to their natural beauty and durability. For an elevated look, exotic hardwoods such as ipe, mahogany, and tigerwood provide a stunning finish with more resistance to weather and insects. These options require proper installation and regular care, but they offer a luxurious feel that suits many of Rhode Island’s historic and custom homes.
Speak with your contractor about the full range of wood options before locking in your deck update. An experienced team will walk you through texture, grain, color, and how each species performs in coastal conditions.
A smart deck update doesn’t always mean a full replacement. Sometimes, cleaning, refinishing, or reinforcing your existing structure makes a big difference.
Start by inspecting for soft spots, protruding nails, or loose railings. If you notice discoloration, cupping, or flaking, it might be time to sand and reseal. Boards that shift or bounce may indicate compromised joists underneath. Addressing those now can save you from more serious repairs next season.
Even newer decks benefit from a touch-up or tune-up. A quick pressure wash and restain can refresh the surface and protect the wood through the winter months ahead. Seasonal maintenance plays a big role in keeping your deck safe and attractive, and it's often the first step of any successful deck update.
Some homeowners prefer to start fresh. If your current deck is beyond repair or doesn’t meet your needs, a full rebuild or new design might be the better investment. Fall is a great time for this work. You can plan comfortably, build without rushing, and have the space ready before spring blooms.
Think about how you want to use the space. Do you need more room for seating? Would built-in planters or a fire feature improve functionality? Is there an opportunity to add a privacy wall or pergola? These considerations should guide your deck update from the start.
A custom deck build opens the door to creative materials and layouts that reflect your lifestyle. And with the right carpentry team, your new deck can integrate seamlessly with your home’s architecture and surroundings.
Many people assume that once summer ends, outdoor projects go on hold. But in Rhode Island, early fall often provides the best conditions for construction. Humidity drops, the sun stays out, and materials settle better without extreme heat.
A fall deck update also gives you a chance to enjoy autumn evenings outside or get the space ready for next year’s use. Plus, local contractors may have more availability, allowing you to complete the work on your ideal timeline.
A deck update isn’t something you want to repeat every few years. That’s why working with an experienced, detail-oriented team makes a big difference. The right crew will assess your current deck, make thoughtful recommendations, and build or repair with skill.
Look for a team that understands coastal homes, materials that work in our climate, and how to blend your new or refreshed deck with the character of your home. Decks aren’t just outdoor floors—they’re a major architectural feature that deserve thoughtful design and lasting craftsmanship.

This multi-level low platform deck makes great use of this backyard space. The real wood deck and benches next to the garden create the feeling of a privately enclosed, secret garden. An oasis, a backyard paradise.

This wooden deck in Newport had new boards installed which were sanded, stained, and reinforced to create this beautiful aesthetic. The railing and stairs were replaced to keep the deck structurally sound.

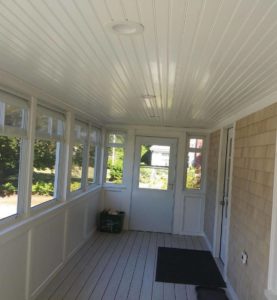
A raised pressure-treated deck in Portsmouth was completely transformed into a closed-in porch. The contractors built the overhang and installed windows to give this homeowner a completely new three-season space to spend their time.

A back door landing repaired and painted to match this beautiful home. Even small spaces deserve a good looking deck and staircase.
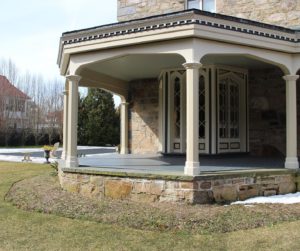
This unique stone home in Portsmouth went under some repairs including the porch area. The original wood was protected from the elements, sanded, and painted a beautiful grey.

An old wooden deck in Middletown was replaced with composite decking and a new PVC railing. The colors match perfectly to the shingles of this home.
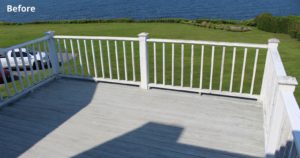
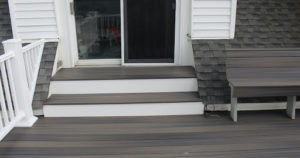
An elevated deck boasting a beautiful view of the water off of a roof is featured here complete with a bench. The railing is constructed from PVC and composite wood for the deck boards as well as the lovely bench.
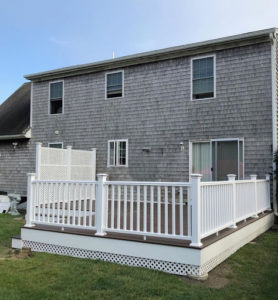
This larger composite deck boasts a privacy fence installed for these homeowners to entertain and enjoy the beautiful weather in a secluded area.
Regardless of the material, your deck and porch can not only look its best but also be maintained regularly for the rest of your home’s protection. If you done your deck maintenance in the spring, take advantage of this time for a deck update or create a whole new backyard oasis.
Whether you need a quick refresh, upgraded materials, or a brand-new structure, a deck update can add value, comfort, and curb appeal to your home. This season is the perfect time to get started.
Our mission at Bruno Painting is “to uphold and care for surfaces and relationships.” The carpentry and painting divisions that make up our team have some of the most skilled and caring professionals in all of Rhode Island. We look forward to the pleasure of restoring your deck this Summer or Fall for you to enjoy all year long. Call us or email us to discuss your deck, painting, or other home improvement project.
This past June, we had the opportunity to restore the exterior of a charming blue-shingled home in Middleton. What started as a request for a fresh coat of paint turned into a more involved project when our initial inspection revealed significant wood deterioration, specifically around the windows.
When wood is exposed to moisture and neglect over time, it begins to decay. This process, known as wood rot, can quickly compromise the structural integrity and appearance of a home. Before any painting could begin, replacing the rotted wood was essential to ensure a smooth, long-lasting finish.
In the case study below, we walk through how our team approached replacing wood rot, restoring the home’s exterior, and ultimately delivering a polished new look the homeowners loved.
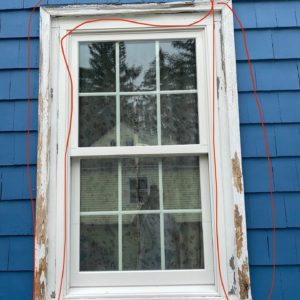
At our initial meeting with the homeowners, we focused on assessing the extent of the damage and identifying the cause, often weather-related, which is common for homes in Portsmouth and Newport. Along the classic coast, homes are frequently exposed to high moisture levels, salty air, and frigid temperatures. Over time, these conditions can wear down paint and deteriorate the materials beneath it, especially wooden window frames and other vulnerable exterior features.
Early signs of wood rot include soft or spongy areas, paint that’s chipping or peeling, splintering wood, and noticeable discoloration. If left untreated, the damage can quickly worsen. That’s why it's important to bring in a professional painting contractor and carpenter as soon as these symptoms appear. They can help determine whether the issue can be repaired or if replacing wood is the better long-term solution.
So how do you know when it’s time for replacing wood rather than repairing it? A good rule of thumb is if more than ten percent of the wood is compromised, replacement is necessary. In some cases, minor rot can be halted and reinforced using epoxy and sealants, but only if caught early.
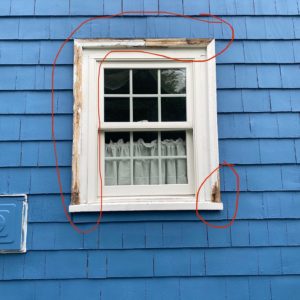
In this particular case, the damage was extensive enough in some places that replacing wood rot was necessary. Our carpentry team made all the necessary repairs before our painters came in to finish the job.
When we removed the rotted frames and sills, our carpentry division took care to pull these boards out without causing damage to the house or windows themselves. Once the old frame and sills were removed, all leftover debris or wood pulp was removed and the area was cleaned.
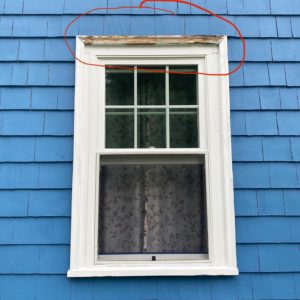
The pieces of the old frame and sill were measured as a reference for the new boards to be put in place. Measurements were also taken of the sheathing where the frame and sill used to sit to ensure that the new pieces would fit securely.
If your home does not have standard fittings and features (and depending on what type of window or home you have), you’ll need a contractor more skilled than the average handyman to help with standout features like mitered corners and fastening sites. Our master carpenter, Chris, and his team did a fantastic job making sure the windows fit perfectly in our client’s home.
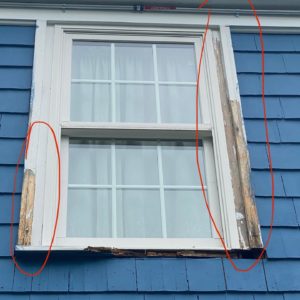
Once the wood frames and sills were removed, our carpentry division inspected the sheathing underneath and made necessary repairs. Repairs that may need to be done on sheathing include using caulk to fill in any smaller cracks and an expanding foam insulation to not only fill larger gaps but to also hold the new boards tightly in place.

Once the new pieces were cut, our painters stepped in to apply a few coats of paint to protect these new pieces of wood from exposure to moisture and water. Once the new window frames were ready, our carpentry division installed them into the sheathing and secured those pieces in place with nails. The final step in installing these new frames and sills is caulking any seams to keep out unwanted moisture, bugs, and other enemies of wood.
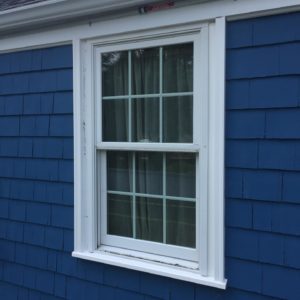
After the frames and sills were installed and inspected for quality, our painters finished the project with a fresh coat of exterior paint. Our team stripped and sanded the old paint to prepare the surface and to prevent unaffected parts of the frames from being exposed to moisture. The entire window trim was repainted with two coats of the highest quality paint to guard against all types of weather conditions.
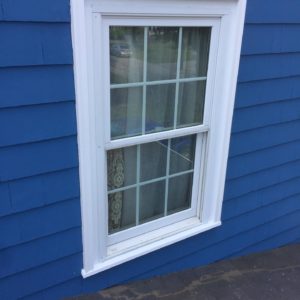
Throughout each step of the process, our team took the time and care necessary to ensure that every surface, from the newly painted siding to the areas where we focused on replacing wood, achieved a flawless, high-quality finish. The homeowners were thrilled with the results and appreciated the craftsmanship and attention to detail we brought to their home.
Since 2004, Bruno Painting has been committed to upholding and caring for surfaces and relationships. We take great pride in our work, and this project was no exception. From replacing wood damaged by coastal weather to restoring the home’s exterior beauty, it was an honor to help create a result that this family will enjoy for decades.
If you’ve noticed signs of damage on your home’s exterior, whether it’s peeling paint, soft window frames, or other signs of deterioration, don’t wait. Contact us today to learn how we can help with evaluating, repairing, or replacing wood to protect your home and restore its curb appeal with lasting results.
Call or email our office for a free estimate to see what we can do for your home!
When Rhode Island residents aren’t out exploring the beautiful attractions and taking in the sites of the coast, we are entertaining family, friends, and others at our home. It’s no wonder why so many have been taking time to focus on home improvement projects during this break from normalcy. If you’ve also thought about hiring someone to do home improvement projects, take a look at these six carpentry projects that are worth the time and monetary investment for your home.
It has been said that ‘wasting time on the deck is time well spent.’ If this is true, then deck updates will be put to good use. From just repairing or staining to a complete overhaul of your deck, you can create an outdoor space that will bring years of enjoyment.

If your deck is already in great shape and you are looking for a more sophisticated look, you may want to consider having a carpenter build a pergola. The shade and design of a professionally built pergola can take your backyard space to the next level.

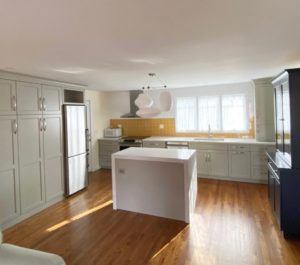
Your kitchen is an integral part of your home, so it needs to function well and facilitate traffic flow. Kitchen remodels are not only one of the most satisfying home projects, they also are one of the most sought after by homebuyers when homes are on the market. The importance of a well-crafted kitchen project cannot be overstated. Master carpenters know how to make the most of any space and create storage that maximizes a kitchen’s potential.
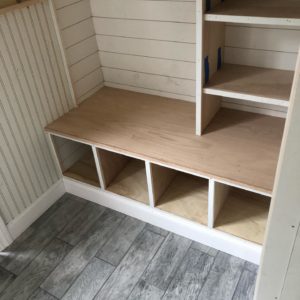
Having all four seasons is just one of the many reasons why we love living in Rhode Island. With the weather, however, comes all the different gear you and your family need to be ready for whatever mother nature decides to bring us. Cue the mudroom. If your entryway or landing space has any room, consider having a contractor construct a mudroom. The added storage alone makes it an easy decision. Not only will you be able to store all those winter gloves and hats in a way that would make Marie Kondo happy, but you’ll also be able to keep the rest of your home clean and tidy.
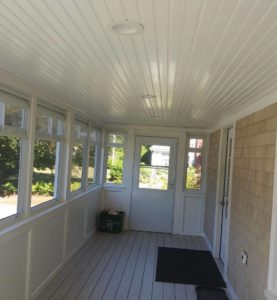
If your family is growing, you may have been considering adding onto your home. Or maybe you have been waiting for the perfect time to turn your porch into a three- or four-season room. Whatever the addition may be, the added square footage to your home brings benefits to your comfort and will likely add value to your home. Having a contractor who can make your addition fit seamlessly with the rest of your home is vital for continuity. Look for the right contractor who can produce a quality build and make it aesthetically pleasing as well.

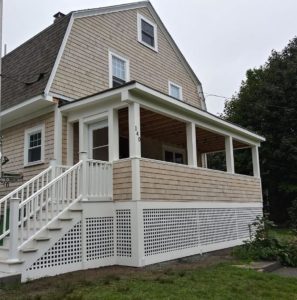
Siding is one of the most important layers of protection for your home. Reshingling or replacing siding that has signs of wear and tear can prevent larger issues, such as wood rot or mold. Additionally, if you already have wood rot or mold, we recommend calling a contractor as soon as possible to take care of the problem. Preventing these common issues is important and finding a contractor who can replace your siding, as well as make any further adjustments to your exterior, is an essential step to prevent any future damage.
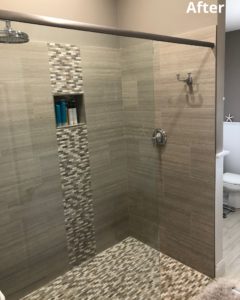
A bathroom remodel is often at the top of many homeowners’ wish lists for home improvements. As with kitchen remodels, updated bathrooms also top the list for homebuyers. Making this space adapt to your needs and desires can make all the difference in your home. If your bathroom has an outdated feel, a skilled carpenter can lay tile, put up or take down a new tub and shower area, add new cabinetry, and replace old vanities and sinks.
Any home updates that require woodwork require a skilled carpenter. Skilled carpenters have experience and expertise with different types of wood and materials to create cabinets, tables, shelving, and other room furnishings. With the right knowledge, a master carpenter can custom make any of these furnishings to your specifications.
At Bruno Painting, we are proud of our carpentry and remodeling division of skilled and master carpenters who have refined their skills and produce incredible results. Our carpenters work ahead of our painting division to ensure that your home gets the quality work it deserves.
Email Bruno Painting the details of your next wish list project. Or call us for a free interior or exterior painting and carpentry estimate.